In this article, we will explore the fascinating world of face recognition and learn how to build our own face recognition system in Python using FaceNet. Face recognition is a powerful application of computer vision that aims to identify and classify faces in images or videos. With the advancements in artificial intelligence and deep learning, face recognition has become more accurate and widely used in various industries.
What is FaceNet?
FaceNet is a facial recognition model developed by a team of Google researchers. It is based on deep learning techniques and is known for its exceptional performance on popular benchmark datasets. The model consists of a deep neural network with 128 layers, which produces a unique embedding or representation of a person’s face. This embedding is then compared with other embeddings to determine if they belong to the same person or not.

Haar Cascade Classifiers for Face Extraction
Before we dive into FaceNet, let’s first understand the concept of Haar Cascade Classifiers. These classifiers are used in computer vision to perform object detection, including face detection. The classifiers are trained using Haar-like features, which are patterns that assist in detecting edges in an image. These patterns are applied to different regions of an image to locate the presence of a face. By using Haar Cascade Classifiers, we can extract the pixel location of a face in an image.
Building the Face Recognition System
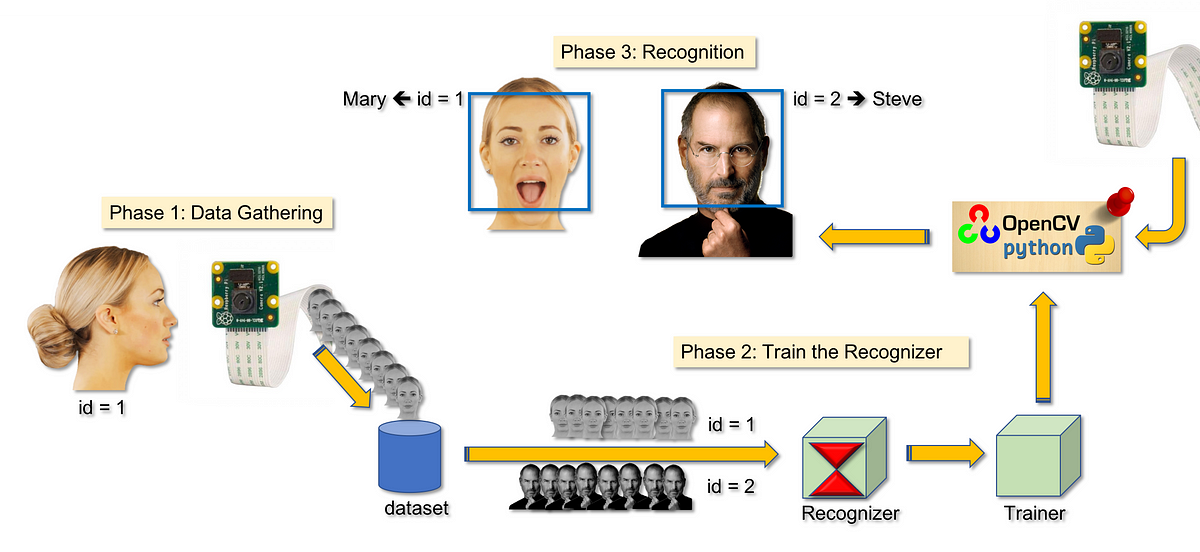
Now that we have a basic understanding of FaceNet and Haar Cascade Classifiers, let’s proceed with building our own face recognition system in Python. The following steps will guide us through the process:
Step 1: Downloading the Video
To begin, we need a video that contains the faces we want to recognize. We can download the video from platforms like YouTube using Python. There are libraries available, such as pytube, that facilitate video downloading. Once we have the video, we can proceed to the next step.
Step 2: Extracting Frames and Faces
In this step, we will extract frames from the video and then extract faces from each frame using the Haar Cascade Classifier. We can use the OpenCV library to load the video and extract frames. For each frame, we will apply the Haar Cascade Classifier to detect faces and extract the pixel location of each face.
Step 3: Preparing the Data
Once we have extracted the faces from the frames, we need to prepare the data for training our face recognition model. We will split the dataset into a training set and a test set. The training set will consist of images of known individuals, while the test set will include images of both known and unknown individuals. We need a labeled dataset to train our model effectively.
Step 4: Training the FaceNet Model
In this step, we will train the FaceNet model using the training dataset. The FaceNet model requires the images to be preprocessed and transformed into embeddings. These embeddings are numerical representations of faces that capture unique features. We will use the pre-trained FaceNet model and fine-tune it on our dataset. The model will learn to map each face image to a unique embedding.
Step 5: Face Recognition and Classification
Once the model is trained, we can use it to classify and recognize faces in images or videos. We will pass the test set through the model and compare the embeddings of each face with the embeddings of known individuals. If the distance between two embeddings is below a certain threshold, we can classify them as the same person. Otherwise, they are considered different individuals.
Step 6: Visualizing Embeddings
To gain insights into the embeddings generated by the FaceNet model, we can visualize them using techniques like t-SNE (t-Distributed Stochastic Neighbor Embedding). t-SNE is a dimensionality reduction technique that can visualize high-dimensional data in a two-dimensional space. By visualizing the embeddings, we can observe the clustering of faces belonging to the same person.
Step 7: Face Recognition in Videos
In addition to recognizing faces in images, we can extend our face recognition system to videos. By applying the Haar Cascade Classifier to each frame of a video, we can extract and classify faces in real-time. This opens up possibilities for applications like video surveillance, access control systems, and more.
Conclusion
In this article, we have explored the fascinating world of face recognition and learned how to build our own face recognition system in Python using FaceNet. We started by understanding the concepts of FaceNet and Haar Cascade Classifiers. Then, we went through the step-by-step process of downloading a video, extracting frames and faces, preparing the data, training the FaceNet model, and performing face recognition and classification. We also discussed the visualization of embeddings and the extension of our system to video recognition. With the knowledge gained from this article, you can now create your own face recognition applications and contribute to the field of computer vision.